
Sn0wbreeze or Evasi0n tool?
So why use Sn0wbreeze over Evasi0n tool? Well if you sport a older iPhone 4 or iPhone 3GS which relies on carrier unlock + hacktivation, Sn0wbreeze is the way to go. Using Sn0wbreeze, you can cook a custom firmware for your device without the upgraded baseband so that you can unlock it with Ultrasn0w.
Supported Devices:
It’s been mentioned many times in the past, but is definitely worth re-iterating that Sn0wbreeze won’t ever be able to inject jailbreaks of any nature onto newer Apple devices until a low-level DFU exploit is found and can be used. It is for that reason that Sn0wbreeze 2.9.10 will only support pre-A5 devices such as the iPhone 3GS, iPhone 4 and the fourth-generation iPod touch.
How-to Jailbreak iOS 6.1.2 using Sn0wbreeze:
Step 1: The first step in the process is to get your hands on the latest version of Sn0wbreeze, currently standing at 2.9.10.
Step 2: Make sure that the iOS device to be jailbroken is connected to the Windows PC via the 30-pin connection cable and the device is running a supported firmware. The latest version of Sn0wbreeze supports an untethered jailbreak on 5.2 firmware for Apple TV, and iOS 6.0 – 6.1.2 for iPhone 4, 3GS, iPod touch 4, and uses the same Evasi0n exploits released by team Evad3rs.
Step 3: Locate the download of Sn0wbreeze from step 1, unarchive the download and run the executable file found within.

Step 4: Hit the blue next button on the bottom-right of the display and select the Browse for an IPSW and point Sn0wbreeze to the relevant firmware for your device. Since iOS 6.1.2 is supported, we advise you jailbreak on that particular firmware. You can download iOS 6.1.2 from this link.

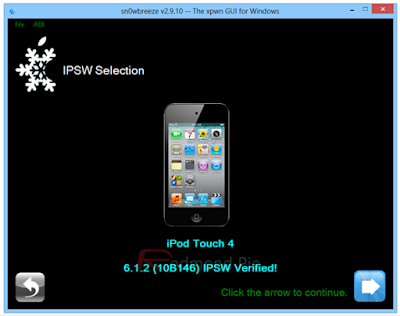
Step 5: If Sn0wbreeze successfully identifies the provided IPSW file then select Next and click on the Simple Mode option that is provided.

Step 6: Sn0wbreeze works by stitching together a custom created firmware file that can then be restored to the device, be patient, this might take a while.

You’ll see this message on the display once the custom firmware is ready:

Step 7: Sn0wbreeze will now ask you to put your device in Pwned DFU Mode, follow the on-screen instructions on how to do so.

Step 8: Once done, Sn0wbreeze will provide an alert to say that the device is now in Pwned DFU Mode. Close Sn0wbreeze, open iTunes and select the connected device from the left hand menu.
Step 9: Press and hold the left SHIFT key on the keyboard before clicking on Restore in the iTunes interface. When iTunes asks for a firmware file to be selected, point it to the custom created IPSW from Sn0wbreeze that will be found on the desktop of the computer.
Step 10: Allow iTunes to go through restore process. When complete, the phone will be fully jailbroken with the beautiful Cydia icon present on the home screen.

So why use Sn0wbreeze over Evasi0n tool? Well if you sport a older iPhone 4 or iPhone 3GS which relies on carrier unlock + hacktivation, Sn0wbreeze is the way to go. Using Sn0wbreeze, you can cook a custom firmware for your device without the upgraded baseband so that you can unlock it with Ultrasn0w.
Supported Devices:
It’s been mentioned many times in the past, but is definitely worth re-iterating that Sn0wbreeze won’t ever be able to inject jailbreaks of any nature onto newer Apple devices until a low-level DFU exploit is found and can be used. It is for that reason that Sn0wbreeze 2.9.10 will only support pre-A5 devices such as the iPhone 3GS, iPhone 4 and the fourth-generation iPod touch.
How-to Jailbreak iOS 6.1.2 using Sn0wbreeze:
Step 1: The first step in the process is to get your hands on the latest version of Sn0wbreeze, currently standing at 2.9.10.
Step 2: Make sure that the iOS device to be jailbroken is connected to the Windows PC via the 30-pin connection cable and the device is running a supported firmware. The latest version of Sn0wbreeze supports an untethered jailbreak on 5.2 firmware for Apple TV, and iOS 6.0 – 6.1.2 for iPhone 4, 3GS, iPod touch 4, and uses the same Evasi0n exploits released by team Evad3rs.
Step 3: Locate the download of Sn0wbreeze from step 1, unarchive the download and run the executable file found within.

Step 4: Hit the blue next button on the bottom-right of the display and select the Browse for an IPSW and point Sn0wbreeze to the relevant firmware for your device. Since iOS 6.1.2 is supported, we advise you jailbreak on that particular firmware. You can download iOS 6.1.2 from this link.

Step 5: If Sn0wbreeze successfully identifies the provided IPSW file then select Next and click on the Simple Mode option that is provided.

Step 6: Sn0wbreeze works by stitching together a custom created firmware file that can then be restored to the device, be patient, this might take a while.

You’ll see this message on the display once the custom firmware is ready:

Step 7: Sn0wbreeze will now ask you to put your device in Pwned DFU Mode, follow the on-screen instructions on how to do so.

Step 8: Once done, Sn0wbreeze will provide an alert to say that the device is now in Pwned DFU Mode. Close Sn0wbreeze, open iTunes and select the connected device from the left hand menu.
Step 9: Press and hold the left SHIFT key on the keyboard before clicking on Restore in the iTunes interface. When iTunes asks for a firmware file to be selected, point it to the custom created IPSW from Sn0wbreeze that will be found on the desktop of the computer.
Step 10: Allow iTunes to go through restore process. When complete, the phone will be fully jailbroken with the beautiful Cydia icon present on the home screen.
